|
Prosticks Articles
經 濟 日 報 - 六 月 八 日
聚 焦 點 的 應 用
在 乾 坤 燭 圖 成 交 量 最 大 之 價 位 稱 之 為 聚
焦 點,由 於 成 交 量 最 大,聚 焦 點 價 位 大 有
可 能 成 為 將 來 走 勢 之 強 力 支 持 或 阻 力
位。聚 焦 點 代 表 市 場 買 賣 角 力 點,在 往 後
一 段 時 間 內,當 價 位 再 次 到 達 此 位 時,買
賣 角 力 會 再 一 次 發 揮 作 用。
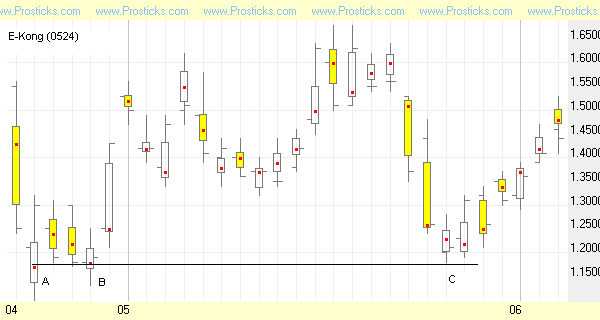
圖 中 是 E-Kong (0524) 股 票 的 乾 坤 燭 圖 走 勢。由
三 月 開 始 股 價 一 直 下 跌 至 四 月 份 時 在 A 點
尋 底。然 後 在 5 月 26 日 股 價 再 一 次 跌 至 C 點
後 作 強 力 反 彈,一 周 內 上 升 近 25%。雖 然 不
能 確 定 跌 勢 已 成 過 去,但 投 資 者 如 能 把 握
在 C 點 時 買 入,肯 定 獲 利 甚 豐。
根 據 乾 坤 燭 圖,C 點 (1.17元) 其 實 就 是 聚 焦
點 A 和 B 的 價 位。A 和 B 代 表 在 這 兩 日 當 股 價
跌 至 1.17元 時 大 量 買 盤 入 市 導 至 最 大 成 交
量 成 為 聚 焦 點。所 以 後 來 當 股 價 再 次 跌 至
C 點 1.17元 時,以 前 的 買 盤 再 度 浮 現 造 成 股
價 大 幅 反 彈。
沒 有 乾 坤 燭 圖 及 聚 焦 點 資 訊,投 資 者 極
可 能 會 傳 統 地 利 用 A 的 最 低 點 (1.10元)作 為 股
價 支 持 位 而 未 能 及 時 入 市,錯 失 機 會。
成交分布量反映市場力量
股 價 及 市 場 真 正 走 勢 是 受 制 於 成 交
的, 只 有 成 交 分 布 量( 不 是 價 位), 才 能 夠 反 映
市 場 真 實 交 投 情 況 及 力 量。單 從 沒 有 成 交
量 配 合 的 價 位 上 落,沒 法 子 知 道 市 場 實
況。 所 以 股 價 的 真 正 支 持 及 阻 力 區 應 從 成
交 量 相 關 的 價 位 資 訊 尋 找,不 能 單 從 開 收
高 低 價 位 得 到。
乾 關 燭 圖 內,每 一 天 或 每 一 枝 燭 身 內 都
有 聚 焦 點 價 位。每 一 個 聚 焦 點 在 不 同 情 況
及 市 場 走 勢 下都 會 發 揮 相 關 的 作 用,忽 視
或 沒 有 這 重 要 市 場 信 息,投 資 者 會 錯 失 機
會。
(前 篇 乾 坤 燭 簡 介 可 從 乾 坤 燭 網 站 www.prosticks.com
常 見 問 題 頁 內 觀 看)
|